Followers

Sunday, February 22, 2015

First Communion Favors and some Challenges

 Dear Scrappers,
I did some bookmarks for as little favors for my son and some of his friends for their first communion.

I used some challenges:
4 crafty chicks
ges as
4 Crafty Chicks:

4CC #234 - THINGS WITH WINGS


and took some acrylic angels from Clear Scraps from mini books, I bought last year in CKC Houston and used them as my main idea;


 The second challenge, I used as inspirations was heart 2 heart challenges:

enTWINEd

and used some scapulary, I bought from a catholic store, instead of twine or ribbon to hang from the bookmark. The shoulder bands are made out of entwined silk threads similar to the ones in baker twine...


 I used alcohol inks and used some techniques I learned as a teacher assistant to Susan from Clear Scraps to ink the head, winds, and dress from the angel:

 I used a silver leaving marker to highlight the edges of the angel's wings:

 For the prayer, I used some I found in some first communion cards at that catholic store and added my child information, printed them using my HP photosmart premium printer. I later cut the angels and the trapezoid prayers using my scan and cut from Brother.


I did have some problems cutting the angels (the scan'n cut didn't recognized all the angels printed in one page). Next time I will try my luck with my scan and cut function from my cricut explorer, however, this time I was in a time cramp and I had to do around 20 angels... Who knows, maybe I won't have the same problems using the explorer...

Here are some pictures from the front and back of the finished angels and from the finished favors:

 I used some Rock Candy glitter from Ranger to give some highlit to the wings in the back of the card and distressed the edges using my Slate ink from CTMH:


Some of the other materials and tools I used:


I hope you enjoyed this fun project and make some comments about my techniques ;-)

Have a wonderful week,

Veronica


Saturday, February 14, 2015

Quick St. Valentine's Day favors for the teachers and aids...

Dear scrappers,
Some challenges online inspired me to use my imagination to alter some great and cute favors holder I got from CTMH:

I used for this project the Valentine treat kit from CTMH and embellished the treat holders differently and following these inspirations:

How I love thee from Craft Hoarders anonymous here

I used some stamps from my stash (Ctmh and graphic 45/Hampton arts) to express some gratitude and love sentiments for my children teachers and aids. I used some leftover felt hearts I bought last year and used for my Be My Valentine shadow box project.


And of course, I have to share my love for stamps, inks and CTMH papers and follow the Love CTMH Way challenge from heart 2 heart blog here

I stamped the sentiments using the Forever in my Heart and Cross stitch wishes (SOTM) from CTMH the Slate ink, I stamped the "happy valentine's day" in some scraps of slate cardstock using pixie ink and made some banners. I finished the banners by added some dazzles from paper wishes (again using my stash). I stamped my children's family name in the back of the banner to made them more personal.

I made some more treat holder using my leftover papers from the previous scrapbooking club layouts and a post it holder diecut from sizzix:


I really love how this ones turned out to be too:

 For the main teachers I used some cookies I learned to decorate from a Friend's class and used actually one of the ones she made (right side one) for my son's teacher.
 I added some purse charm/key chain I had bought for teachers to the inside of the treat bag:

 I fished this project very quickly and didn't have to carry to many tools either....
I love those new treat holder kits from CTMH, so versatile, so easy...
I hope you enjoy my project and get inspired by it and keep it simple from time to time...

Spoilers alert, for next project, I am getting inspired by a getting messy challenge ;-)
have a fun Mardy Grass weekend,

- Posted using BlogPress from my iPad

Vicky Tovar


Sunday, February 8, 2015

Be my Valentine Shadow Box (Graphic 45) and some challenges

Dear Scrappers,
For this project I used 3 challenges as inspiration:

Simons say Stamp blog, Wednesday challenge: all things bright and beautiful:
http://www.simonsaysstampblog.com/wednesdaychallenge/simon-says-all-things-bright-and-beautiful/
For this challenge, I used tons of Rock Candy distress glitter from TH and blings from Queens and co... To make my project extra bright and beautiful ;-)

Next I used the inspiration from:
The crafty boots challenge: hearts and valentine:
http://craftybootschallenges.blogspot.co.uk/2015/02/hearts-and-valentines.html
By keeping my project very much Valentine's related with hearts and Cupid...

And finally I used the challenge from:
Mixed media think pink:
http://mixedmediamc.blogspot.com/2015/02/mixed-media-monthly-challenge-9-think.html
I used the paper collection from Graphic 45 "sweet sentiments" and kept my project in a pink mood, by using spun sugar distress paint (TH), felt pink heart, prickled raspberry spray ink, and pink blings...

And this is what I finally ended up doing:


I found this cute 4.5" x 4.5" wooden box at our local Scrapbooking store before they close, and after looking at Pinterest for ideas I found that the sweet sentiment papers from Graphic 45 were perfect and lucky me, I found them online and the Hampton Arts stamps to got with the idea...
When I saw the challenge this week, I got to work and put all the idea together into this cute shadow box.

I painted the whole box with gesso to give the acrylic paint something to grab on.


I painted the box with a mixture of white acrylic paint and prickled raspberry spray stain to make a cute tone of pink.


I sprayed the back of the box with the spray ink to see the effect:


But decided to use modeling paste instead for more a mixed media feeling.


I added a heart charm from TH (IdeOlogy).


This is a close up of the embossed Dollie.


I stamped a postcard image with a Dollie heart (using slate ink from CTMH) to give it some contrast as a background. I fussy cut a Cupid image with a Cello and added some edging lace (with is sticky back) and some rock candy distress glitter.
I finished the inside with some flowers I found at Jo Ann's attached them together with a wooden button from Michaels and baker twine, finishing the look with a flower bling.
The felt heart shape was stamped with "Love" using slate ink.
I added some more red lace as contrast in my final layer...


For the outside, I fussy cut some of the postage images adding some rock candy glitter to the edges, and added a veneer bird I had in my stash, painted it with spung sugar and added some rock candy distress glitter.


I added some more glitter to the fresh added modeling paste before it dried out, but it is a very delicate sparkle, difficult to get on camera...
I combined two of "Be my Valentine" sayings from the paper collection and added two blings to the sides. I added the TH charm to the center of the title using more baker twine.
Finally I stamped on the glass the "I love You" using claret StanzOn...


I hope you enjoy my project and leave me some feedback...
Have a very blessed week,


- Posted using BlogPress from my iPad

Vicky Tovar


- Posted using BlogPress from my iPad

Vicky Tovar

Thursday, January 22, 2015

SA Scrapbooking Club January Meeting

Happy New Year dear Scrappers,
As you can see by my greeting, this is my first post for the year...
One my new year resolutions is to scrap more and to finish many if my ongoing projects. Another one is to teach at least 2 classes per month.
I also need to catch up more often in my blog ;-)
Trying to accomplish my second goal, I thought this class for my Scrapbooking class.
I gave the club members the the choice between the Snowhaven and the heartstrings paper packs, complements and embellishments (ctmh).
I choose 2 sketches from Jeanette Lynton's Magic book. And added some fun hidden options for each one.
This are the samples:
Heartstrings:


One of the club members wanted a canvas, thus I attached this layout to 2 canvas...


Snowhaven


I used the envelope maker from MM, and some distressing paint (TH) to the canvases...
I hope you enjoy this small inspiration...
Have a fun and very blessed year,

- Posted using BlogPress from my iPad

Vicky Tovar


- Posted using BlogPress from my iPad

Vicky Tovar

Sunday, November 2, 2014

Haunted Canvas and some challenges...

Dear scrappers,
I got very inspired by some ongoing challenges to make this project:

1- The crafts hoarders anonymous challenge blog: Layer it


I used some grey prepainted 12x12 canvas and layered it with seedless preserve TH mini distressing ink. I then, added some dimension using Theresa Collins templates and a mixture of grey inked gesso and modeling paste. I used some spellbinder dies to cut the spooky frames using metallic terracotta cardstock. I distressed the frames using distressing inks and paints form Tim Holtz and metallic rubons inks.
I cut out the words "haunted Halloween" from a embossed goldrush cardstock (CTMH) using the Sizzix Texture Fades Embossing Folder Halloween Words.


I distressed the words with black and white distressing makers, distressing inks and metallic rubons ink to highlight the risen areas... I added a spooky charm using a TH Idea-Ology enamel tag distressed w/ metallic paint (TH). I added a Skull/crossbones adornments to finish the spooky look.


The click was cut using my new Cricut explorer and the happily ever after cart. I cut the shadow from slate cardstock (ctmh) and then I let the cricut draw the other layers using different markers. Later I colored the layers with distress markers and the special technique described in the 2nd. Challenge:

2- CC3 challenge 14: Colored Crackle: at CC3C 14: Colored crackle">At Linda's blog

I used this technique to distress some areas of the frames and for part of the clock.


The effect wasn't as neat as it was in my husband tray, but I am still please to have included as layer in my haunted canvas.
I printed on vellum the hitchhiker ghosts based from the one displayed in a Pinterest post inspired by Disney's haunted mansion and movie...
I used vellum to get the see-through effect from ghosts and added some rock candy distress glitter and distressed the edges with vintage photo distress ink (both from TH):


Note:

This second challenge is being sponsored by the the Funkie Junkie

Please visit them...

And don't forget to buy a copy of CC3 from Tim Holtz himself, very nicely signed Here

I hope you enjoy this challenges as much I did, please consider to join me in exploring Tim's fun techniques,
Have a very blessed week,
Vicky

- Posted using BlogPress from my iPad

Vicky Tovar

Tuesday, October 28, 2014

CC3C Colored Crackle

Dear scrappers,
Finally I get to publish this project. I have been in such a hurry lately, but I am taking a few minutes to publish my latest project:
A modified Kaiser crafts tray for my husband to put his stuff when arriving home everyday...
I used Graphic 45 papers, and many Tim Holzt goodies (distress paints, inks, crackled paint, and Ide-Ology 3d embellishments).
I got inspired by many of the CC3 curiosity crew, who outdid themselves and gave me so many ideas...
CC3C 14: Colored crackle
Linda is being so great to host this challenges every 15 days.
Here the final product:


Some close-ups


The technique is meant for non-porous surfaces, by it kind of work beautifully on the clock faces...


Sitting on his side of our vanity...


From about...
I used brads without the prongs to label each compartment...


Wonderful technique...
This challenge is being sponsored by the the Funkie Junkie
Please visit them...
And don't forget to buy a copy of CC3 from Tim Holtz himself, very nicely signed Here
BTW, I made a snapguide of this project here


Have fun joining this creative challenge,

- Posted using BlogPress from my iPad
Vicky Tovar

Friday, September 26, 2014

Compendium of Curiosities 3, Challenge 11!- Spooky Clock

Dear scrappers,
What a rush these days...
I've been helping my dearest lately and almost not time for blogging.
A quick challenge that I wanted to participate:

Compendium of Curiosities 3, Challenge 11!
Effect Powders, based on Tim Hotlz latest book Compendium of Curiosities 3, hosted by Linda Ledbetter.

Sponsors this week's challenge: Inspiration Emporium
This is my entry:
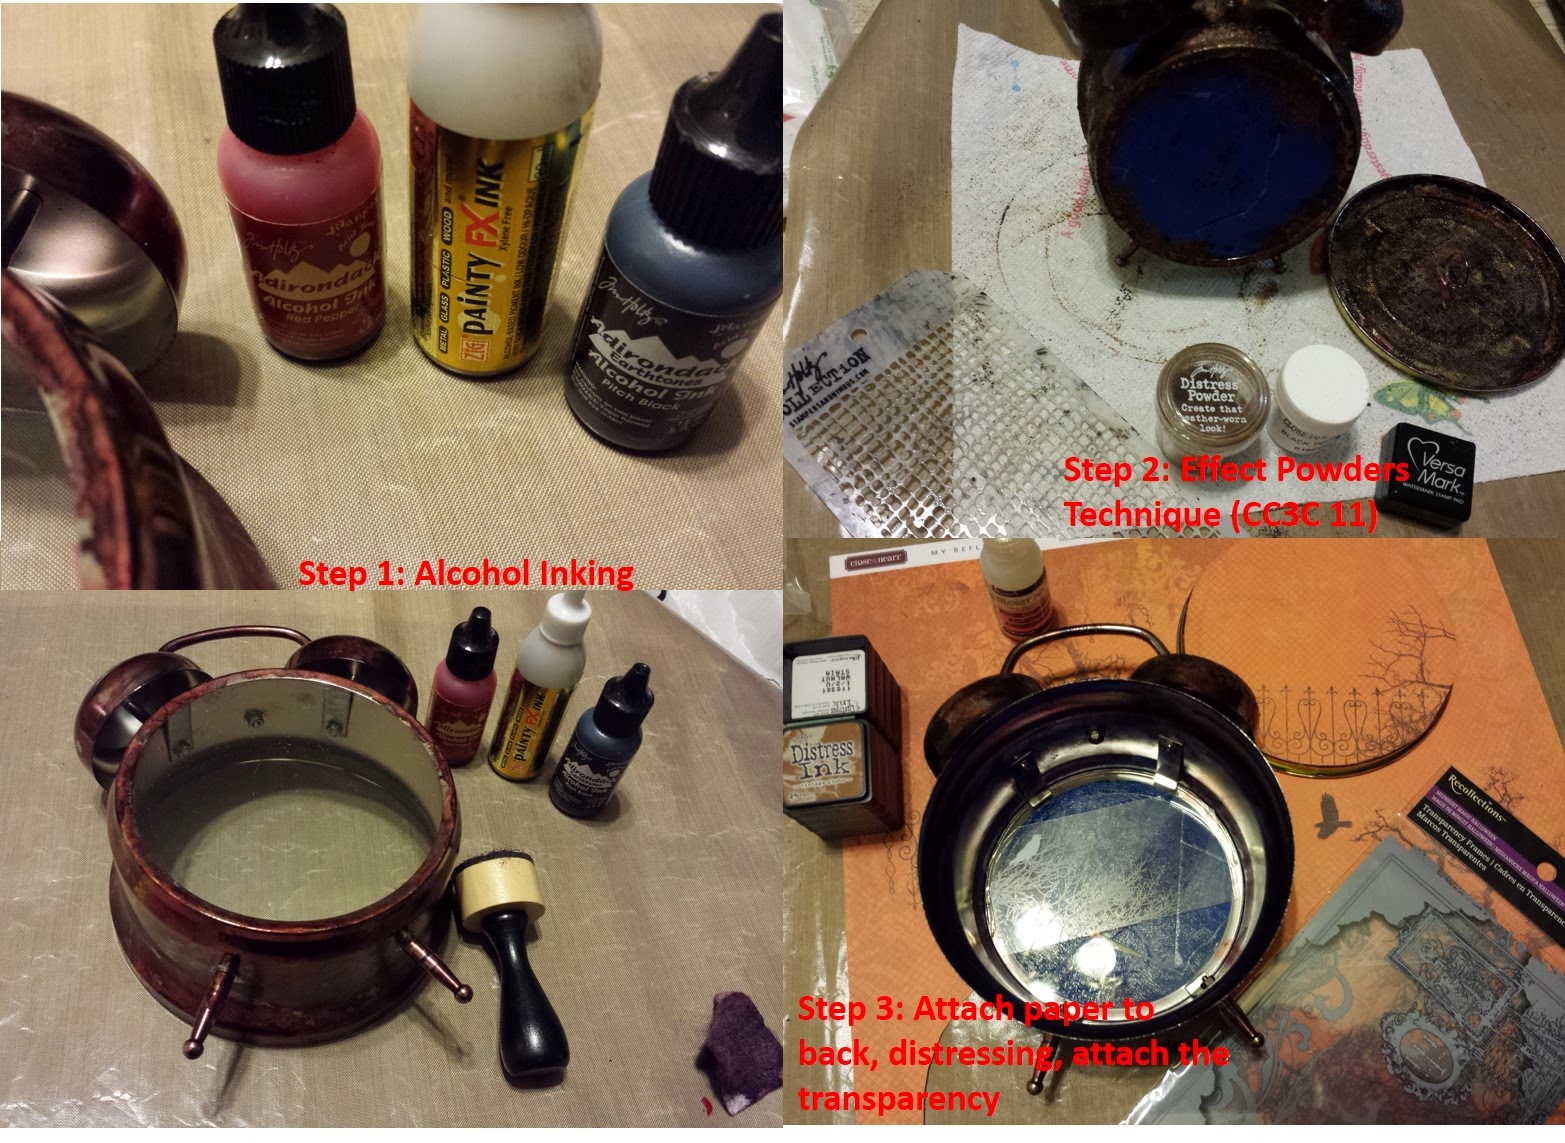
I started this clock to enter the previous challenge, however, I used a different technique (crackle paint) long story short I didn't finish on time.
I decided to use this challenge technique to finish my clock and converted it in a class for some dear friends.
I will this time my picture do the talking:


Preparation and technique:

close-up of the technique and the inside of the clock

The tags and more of the technique

Staining of the ribbon for my spooky tags:

Another tag I did with the help of one of my students:
The flowers:
the dies I used:
 My students' clocks, all different and amazing:
Amazing students, don't you think, they all deserve to enter in my opinion, however, I will just enter mine ;-)
Have a wonderful weekend,
Vicky