Followers

Sunday, November 2, 2014

Haunted Canvas and some challenges...

Dear scrappers,
I got very inspired by some ongoing challenges to make this project:

1- The crafts hoarders anonymous challenge blog: Layer it


I used some grey prepainted 12x12 canvas and layered it with seedless preserve TH mini distressing ink. I then, added some dimension using Theresa Collins templates and a mixture of grey inked gesso and modeling paste. I used some spellbinder dies to cut the spooky frames using metallic terracotta cardstock. I distressed the frames using distressing inks and paints form Tim Holtz and metallic rubons inks.
I cut out the words "haunted Halloween" from a embossed goldrush cardstock (CTMH) using the Sizzix Texture Fades Embossing Folder Halloween Words.


I distressed the words with black and white distressing makers, distressing inks and metallic rubons ink to highlight the risen areas... I added a spooky charm using a TH Idea-Ology enamel tag distressed w/ metallic paint (TH). I added a Skull/crossbones adornments to finish the spooky look.


The click was cut using my new Cricut explorer and the happily ever after cart. I cut the shadow from slate cardstock (ctmh) and then I let the cricut draw the other layers using different markers. Later I colored the layers with distress markers and the special technique described in the 2nd. Challenge:

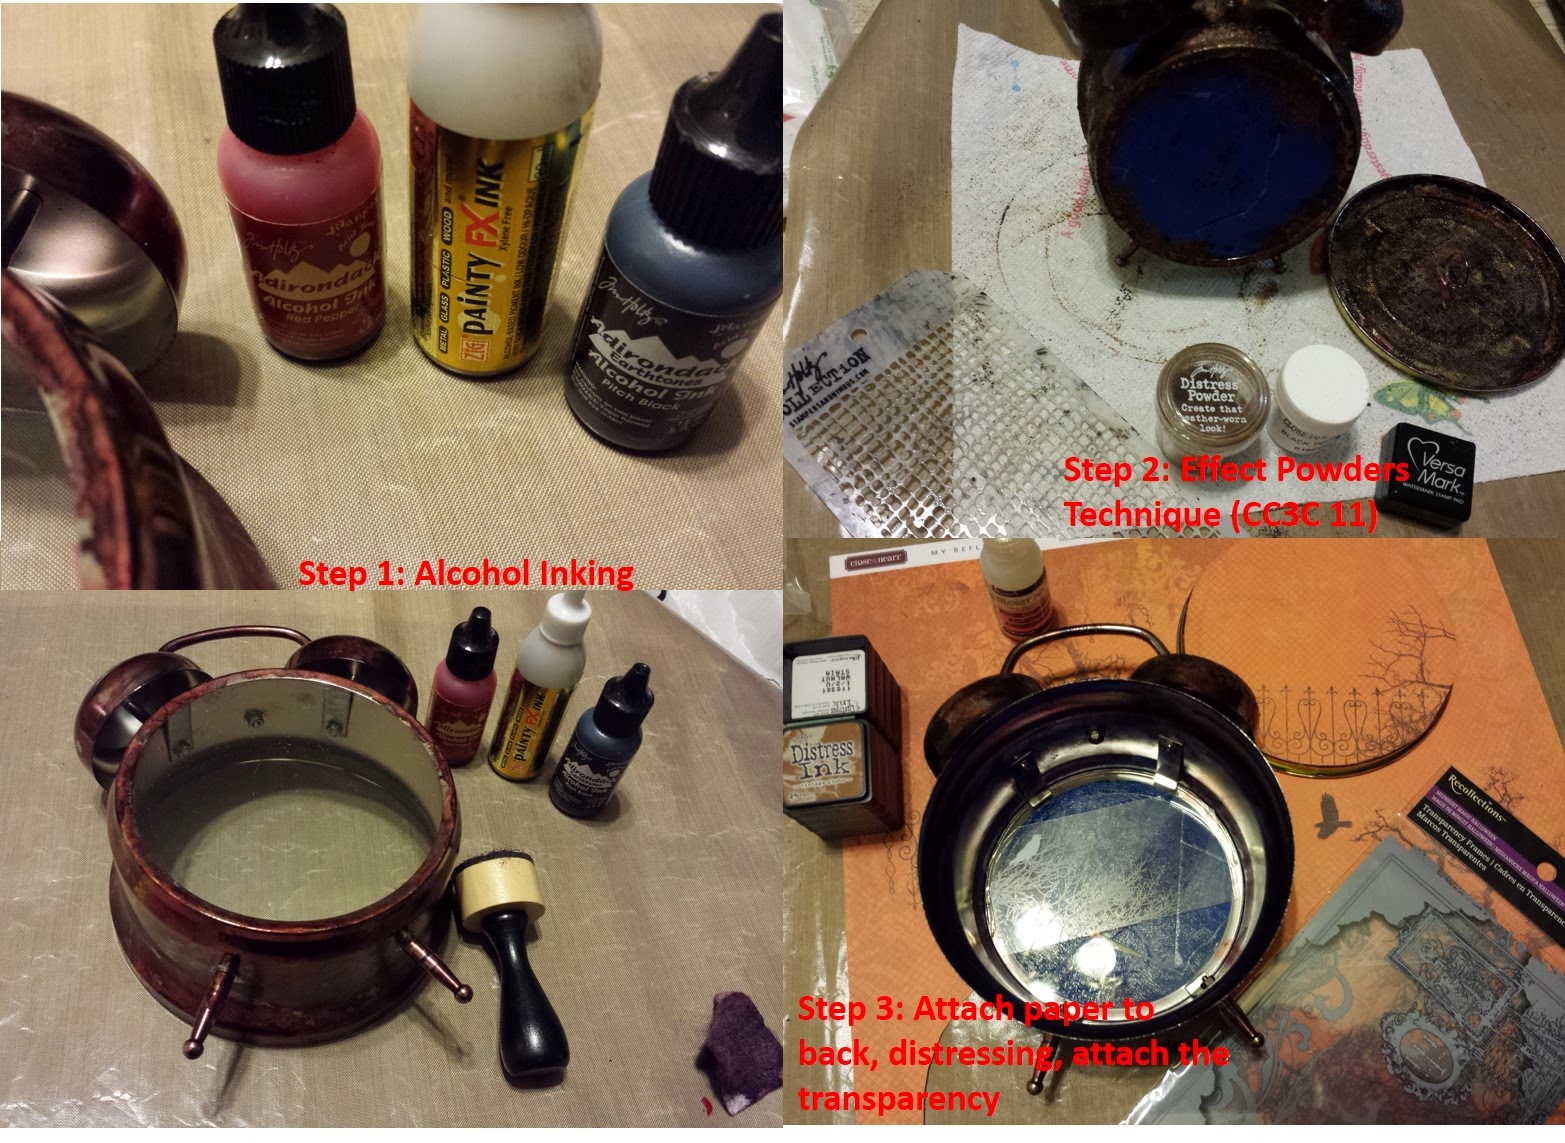
2- CC3 challenge 14: Colored Crackle: at CC3C 14: Colored crackle">At Linda's blog

I used this technique to distress some areas of the frames and for part of the clock.


The effect wasn't as neat as it was in my husband tray, but I am still please to have included as layer in my haunted canvas.
I printed on vellum the hitchhiker ghosts based from the one displayed in a Pinterest post inspired by Disney's haunted mansion and movie...
I used vellum to get the see-through effect from ghosts and added some rock candy distress glitter and distressed the edges with vintage photo distress ink (both from TH):


Note:

This second challenge is being sponsored by the the Funkie Junkie

Please visit them...

And don't forget to buy a copy of CC3 from Tim Holtz himself, very nicely signed Here

I hope you enjoy this challenges as much I did, please consider to join me in exploring Tim's fun techniques,
Have a very blessed week,
Vicky

- Posted using BlogPress from my iPad

Vicky Tovar

Tuesday, October 28, 2014

CC3C Colored Crackle

Dear scrappers,
Finally I get to publish this project. I have been in such a hurry lately, but I am taking a few minutes to publish my latest project:
A modified Kaiser crafts tray for my husband to put his stuff when arriving home everyday...
I used Graphic 45 papers, and many Tim Holzt goodies (distress paints, inks, crackled paint, and Ide-Ology 3d embellishments).
I got inspired by many of the CC3 curiosity crew, who outdid themselves and gave me so many ideas...
CC3C 14: Colored crackle
Linda is being so great to host this challenges every 15 days.
Here the final product:


Some close-ups


The technique is meant for non-porous surfaces, by it kind of work beautifully on the clock faces...


Sitting on his side of our vanity...


From about...
I used brads without the prongs to label each compartment...


Wonderful technique...
This challenge is being sponsored by the the Funkie Junkie
Please visit them...
And don't forget to buy a copy of CC3 from Tim Holtz himself, very nicely signed Here
BTW, I made a snapguide of this project here


Have fun joining this creative challenge,

- Posted using BlogPress from my iPad
Vicky Tovar

Friday, September 26, 2014

Compendium of Curiosities 3, Challenge 11!- Spooky Clock

Dear scrappers,
What a rush these days...
I've been helping my dearest lately and almost not time for blogging.
A quick challenge that I wanted to participate:

Compendium of Curiosities 3, Challenge 11!
Effect Powders, based on Tim Hotlz latest book Compendium of Curiosities 3, hosted by Linda Ledbetter.

Sponsors this week's challenge: Inspiration Emporium
This is my entry:
I started this clock to enter the previous challenge, however, I used a different technique (crackle paint) long story short I didn't finish on time.
I decided to use this challenge technique to finish my clock and converted it in a class for some dear friends.
I will this time my picture do the talking:


Preparation and technique:

close-up of the technique and the inside of the clock

The tags and more of the technique

Staining of the ribbon for my spooky tags:

Another tag I did with the help of one of my students:
The flowers:
the dies I used:
 My students' clocks, all different and amazing:
Amazing students, don't you think, they all deserve to enter in my opinion, however, I will just enter mine ;-)
Have a wonderful weekend,
Vicky

Sunday, August 17, 2014

Accordion Card/ Wall Panel

Dear scrappers,
For this project I was inspired by actually 3 challenges:
Using Tim’s Faded Layers technique. Btw, this challenge just passed and I didn't get to finish my project on time. I had just the background done last Friday...
Don't forget to check out this challenge sponsor: Joy and her family at Inspiration Emporium
Great online store. 

Compendium of Curiosities 3, Challenge 9!

Using the Sizzix Alterations Framelits! using Tim's book  A Compendium of Curiosities, Vol.3, as inspiration.
Which I used to embellish my tri-fold (accordion style) card/wall panel.

and finally:
Challenge #13 - Let's Cycle...Up-cycle, That Is!
This challenge was actually what inspire me to use my otherwise- thrown -away glossy packing material instead of cardstock for my card.

Here is a picture of the final project:

 Here is how it looks hanging on my wall:
 Here is how the card looks when folded:
Here is in detail how each panel/part looks in close-up:
I won't go in details how I made the background for either panel/part, but how I got the inspiration. I always get the question, from where did you get the idea, well, the answer is simple: I look for ideas in Pintarest, other crafter blogs, and challenge blogs.
The Craft Hoarders Anonymous Challenge blog inspired me to look around and see a second use to my otherwise-thrown away pieces around my house:
I was preparing my scrapbooking club class this past week and came across this very interesting 3D-embellishment packing and got also inspired by a Clear Scraps class at CKC-Houston  to use it for a card:
I also used a cricut cut (ArtBooking, CTMH) as stencil in a similar way I used it in my scrapbooking layout for the class, see the transparency background. I was keeping this cut for another project as well..
As mentioned I used the faded layers technique for the background of the part 1 and 3 of the tri-fold card.
I also stenciled some butterflies using distress inks over the faded layers.
For the middle part (the transparency), I decided to used a part of my craft hoard: the 1.double sided
patterned adhesive from ClearSnap and some Vintage Velvet glitter from Ranger:
I love how this glitters highlights the background.
For this CC3-challenge 9, I used the Framed Silhouettes alteration framelits on foil-taped packing material from my son's school shirts. I stamped the foil with Platinum Metallic StaZon:  
 I also used some mirroed stars to embellish the frames and wanted to match the color of the Adirondack markers (Ranger) I used to distress and color some of the shapes. Thus, I took some DecoColor markers to distress the stars.
For the back of the card, I used some tissue wrap and adhered it using Glue'n Seal (Ranger) to the back of part 1 and 2 of the cardstocks and distressed it with distress inks (Ranger)
That way, when the card is open halfway, the tissue wrap is seen through the transparency.
I also used the G Apha Card and Chitchat stickers (Idea-ology) to add my favorite quote from Gabriel Garcia Marquez (Gabo) to the center of the card on the transparency. You can see my message to her written in the back of the last panel on the tissue wrap...
I am planning on giving this card to my Mom (Gloria), who's bday is the 20 and who loves Gabo too. Thus, I added my children pictures and framed them using this CC3-technique as well. She will get it in and envelop and surprise when she opens the whole panel and realizes she can hang it on the wall too.
I hope you enjoy this project and decide to participate in these great challenges,
Have a wonderful week
Vicky

Wednesday, July 30, 2014

My Son's Initials and some Challenges

Dear Scrappers,

Greetings from Galveston.
This week, I am designing and writing from the gulf coast ;-)
My kids are at the NASA camp having a blast and leaving me some time to take care of many errands. And giving me the opportunity to attend  CKC Houston, thus I wanted to finish this project and share it with you quickly.
I bought these cardboard letters for my son's room. I used as inspiration three different challenges from my favorite blogs that I have been following:

CC3 Challenge 7: Painted Industrial

Challenge-12: whos-boss from Craft Hoarders Anonymous
which is all about embossing...

and finally from Simon Monday Challenges:
J as Inspiration: Jump Rings

I love all three blogs and use them as inspiration as much as I can. I get motivated to create by them and love their designers.
As many of you know, I have tried to keep up Tim's newest book: Compendium of Curiosities 3 and many of the techniques used here, I learned from there.
Inspiration Emporium is sponsoring this CC3 challenge #7, please visit Joy... and say Hi from me ;-)

Here is my finalized  project:
I used some papers from CTMH wotg: Later Sk8er and some of their elements.
I used Tim's Painted Industrial technique for my foil taped cardstock strips and die-cuts. Details for that technique to be found in page 46 of CC3...
I used the embossing Diamond Plate & Riveted Metal Set by Tim Holtz for the metal strips and die-cuts made with Sizzix Bigz BIGkick/Big Shot Die by Tim Holtz, Gadget Gears:

 I used a previously made for the center of the A, and for the letters to spell my son's names die-cuts (Inside out)  from light grey cardstock and some foil-taped pieces too.


 I used TH picked fence paint to distress the cardboard edges and some grey crayon from my daughters' stash (who is beginning to be a craft hoarder too ;-).

The outside of the letter were distressed with peacock feathers distressing ink to highlight them against the grey papers...
Here is a close-up of the different letter I used:
 I added a rocket to the A to highlight the Outer space collage paper from Karen Foster...

 I used some Jump rings (Ring Fasteners from Idea-ology TH) instead of regular brads using the Simon Monday Challenge as inspiration and a way to add later some Lego gears from my son's stash and to make this lock piece movable (this die, i bought ages ago and finally i got to use it ;-)
My son loves all kind of locks and gears. He inherited my father's engineer's mind ;-)

 I also used some Hitch fasteners and game spinners to complete the steam-punk look...
Some gears were distressed using oregano alcohol ink (i bought this ink set in my first convention back in 2007) and more peacock feathers distressing ink.

 I added some of the Later Sk8ter elements to the gears after distressing them too to complement the look:
I tried to distress the Idea-ology mirrored star and added it to the Later Sk8ter one:

 A closer look to each single letter:

I hope you enjoyed this fun project and give me some feedback.
Please follow my blog as well (I'm trying to get my numbers up ;-)
Have a blessed weekend and I hope to see you at CKC this Thursday or Friday,
Vicky

Tuesday, July 29, 2014

SA Scrapbooking Club, January meeting

Happy New Year dear Scrappers,
As you can see by my greeting, this is my first post for the year...
One my new year resolutions is to scrap more and to finish many if my ongoing projects. Another one is to teach at least 2 classes per month.
I also need to catch up more often in my blog ;-)
Trying to accomplish my second goal, I thought this class for my Scrapbooking class.
I gave the club members the the choice between the Snowhaven and the heartstrings paper packs, complements and embellishments (ctmh).
I choose 2 sketches from Jeanette Lynton's Magic book. And added some fun hidden options for each one.
This are the samples:
Heartstrings:


One of the club members wanted a canvas, thus I attached this layout to 2 canvas...


Snowhaven


I used the envelope maker from MM, and some distressing paint (TH) to the canvases...
I hope you enjoy this small inspiration...
Have a fun and very blessed year,

- Posted using BlogPress from my iPad

Vicky Tovar

Thursday, July 17, 2014

Dream Burlap Panel inspired by Tim's CC3


Dear scrappers,

This week I used some inspiration from the Challenge 6, which """introduces Tim’s Altered Burlap Panel Technique, to be found on page 37 of A Compendium of Curiosities, Vol. #3 (a.k.a “CC3″)"""
lindaledbetter.com/2014/07/compendium-of-curiosities-3-challenge-6.html

Here the final picture:


Adding an old photo from our Europe trip back in 1995... I printed it in card stock and distressed the edges using antique photo ink.


I bought my TH tissue paper and burlap panel as soon as I saw this challenge, but just until yesterday I got to play with it... I used some of TH from Ideo-logy ephemera, such as keys, pins, swivel chain, die cuts, and the binding for the picture.

I used my fiskars ruler to tear the tissue paper before gluing it to the canvas to obtain a scallop border.


I used many of Ranger's TH distressing inks and paints for accenting some of the cuts and used some stencils as well (TH and Theresa Collins).

I decided to use the Eiffel Tower die cut, I made during a technique Tuesday class from Caroline Cowling at Stamp Antonio before they close the store. The technique was to make faux repujado embossed pieces using foil tape on card stock and embossing folders...

I made the "Dream" sentiment as well using this technique. After embossing using some repujado tools, I painted the pieces using alcohol inks and blending solution also from TH.
I really missed those classes because even if I didn't finish a project (mostly because my lack of time), I learned so many techniques and was able to use the finished elements in cards, or scrapbook pages, or any other project I had. In this case I used them as central elements in my burlap canvas...


I enjoyed using the stencils with either distressing inks or paints to layer the card stock ephemera for the background...

I attached the keys to the frame of the canvas using a pin and a swivel chain. I had made the square embossed metal tag, (idea inspired by the Tag you're it challenge by Crafters Hoarders Anonymous Challenge blog:

http://gloriadesignschallenge.blogspot.com/2014/07/challenge-11-tag-youre-it.html) when I got my metal embossing plates and wanted to practice how to make this technique. This challenge was a great opportunity to use that item from my stash...


I also a bow pin form one of my CTMH old workshop on the go kit (with the Paris theme) to embellish the faux metal embossed Eiffel Tower.
I used some of the sticker phrases I got as gift when I bought the CC3 book from TH. I distressed the edges following the book technique and distressed them with antique photo ink...

I hope you enjoyed my take to this challenge and hope to participate as often as I can ;-)
Thanks for looking into my blog,

Vicky


- Posted using BlogPress from my iPad

Vicky Tovar